upcoming review: BAE RBAV-AF

Monday, August 13, 2012

Comprehensive Tips: The Combat Side Stroke

There are exactly four hundred million billion and eight videos on YouTube from NSW/NSO Mentors and/or former SOs that go over the basic steps of the CSS, so I will not be boring you or myself with taking a bunch of pictures of myself in the pool. I expect you know the CSS, or can find these basic tutorials fairly easily if need be. This article is intended to be a compilation of essential tips that may help the CSS just "click" for you. Good luck, keep it light.

1. Level out. Kicking your legs down into the water and kicking your body up out of the water is obviously inefficient. As tempting as it is to new or weak swimmers to tilt upwards so as to get more of the head out of the water and get closer to that lovely, lovely air, keep your body underwater and as parallel with the surface while remaining subsurface as possible. This will not only aid in increasing the stroke's efficiency, but it will also ingrain one of the essential tenets of the CSS into your muscle memory, that being signature reduction. A proper CSS will maintain a very low visual and audible profile. No white water, silent killers, etc.

2. Rotation, rotation, rotation. After college, I worked for a year in a grocery store. They always told me "Rotation, rotation, rotation" when referring to perishable products. Little did they know how useful this lesson would be. As you bring your first arm stroke down to your side, ROTATE your shoulders with it. You ought to end up at least on your SIDE, if not more on your back. One way to ingrain this motion into your stroke is to literally rotate all the way onto your back, survival float style, after each side stroke. Return to normal start position, almost face down, whenever you like. If you cant tell if youre doing it right, your NSW/NSO Mentor will be able to. If you have yet to make contact with one, get a buddy at the pool, explain to them what youre supposed to be doing, show them some videos maybe and have them observe your stroke. If you can conceive an axis along which you are traveling through the water, you ought to be rotating about this axis- just like long distance freestyle.

3. Lift your chin, not your head to the air. Follow your shoulder with your chin to learn to do this. As with other strokes, periodically lift your head up and check your direction to ensure you arent going to hit anyone/thing.

4. Breathe. This cannot be said enough and requires much more practice than most think. Breathing when swimming is not as easy and therefore not the same as breathing when running. If you are having trouble maintaining a sustainable breathing pattern when swimming, Swimmers Pullups are the first step in building breathing ability and timing. These do not focus on lung capacity, which is something else entirely. Make sure you have a good pool edge to practice on, something you would feel confident grabbing to exit the pool. Grab the edge and go under till your arms hit full extension. Pull yourself up out of the water until your arms hit full extension. Breathe in when you can and out when subsurface each time. Starting goal: sets of 20-30, no time limit just as fast as you can. Do with your Flutter Kicks, 10 Counts, etc. Dont hit your chin on the edge of the pool.

5. The current PST is a moderate swim in terms of length, but still, every little bit counts. Be sure to ingrain efficient movement only into your stroke and exclude any wasted movement. That means: Bring the hands close to the body when extending them forward. If you flutter kick, fine, thats your call. If you do not, do not allow the legs to move side to side while stroking with the arms. Do not go deeper than you have to in order to stay subsurface when kicking off the walls. Obviously, there is no reason to travel down and then up when all we need to do is go side to side. The kickoffs are your greatest opportunity in the PST, kick hard, use an efficient profile to get through the water, ride the kickoff out all the way. A far as making your second stroke efficient is concerned, you do not need to keep your arm fully extended during the stroke. It may curl inward towards your torso as you pull it down. Again, no need to pull you up out of the water, were just going sideways.

6. I had the same problem when I got into BJJ, everyone I saw getting into it did. Keep. It. Light. The PST is a series of tests, not just a swim. Naturally it is pointless to crank out an 8:30 500m CSS if you then get out and can only muster 40 pushups in 2:00. It is highly unlikely that you will get picked up or be allowed to continue training without retesting. So, keep it light. It may help to consider that you ought to be gliding, not fighting through the water. Keeping your exertion levels low will also allow you a little more room for error with your breathing.


Friday, April 6, 2012

Polishing Glock Safety Plungers

It aint perfectly mirror polished, but I did reprofile and polish my edc 19's safety plunger just for the hell of it. I also polished the trigger bar contact area using the same processes and achieving similar results in terms of finish. I did not reprofile the trigger bar contact at all.  The only bad things that could come of this modification are: messing up the profile and inducing some corrosion issues through messing with the finish. I dont make mistkes so I didnt have to worry about the profile and I highly doubt that it would be able to oxidize past a superficial point in my lifetime. Even if it did, presuming shit has not hit the fan and I can still order one from LWD, a couple bucks and a couple days gets me a brand new one. Problem solved.

Anyways. This does noticeably smooth the takeup, even for absolute trigger philistines. If you regularly let out past reset, this may come into play with your follow up shots, but for most it will probably only matter when acquiring the trigger's wall directly after the draw. Consider whether this amount of work is really worth this marginal, truly insignificant payoff. That said, this is coming from someone who never understood the allure of a glass rod 1911 trigger as opposed to a Glock's spongebrick trigger for defensive purposes. So. Take it with a grain of salt. It is an improvement in the takeup, the takeup just aint that important to me.

If you are considering doing this, REMOVE THE PLUNGER'S SPRING. This ought to be common sense. If you go at the thing with a Dremel and any steel brush tip to start with, it will send the spring flying as soon as it touches it and it will take forever to find. Depending on where you are, you may never find it. So, set it aside with your other small parts as you usually do in a baggie or box or whatever. Just keep track of it. Also, even if you are using a sanding tip for the initial reprofile and not a grinding wheel, you can seriously fuck up the plunger if you do not take it SLOW and GENTLE. Remember to keep the plunger's head the same height, you are ONLY reprofiling the edge, that is ALL. If you attempt to polish the tip of the plunger and in doing so shorten it, it may not allow the striker to clear it when the trigger is pulled and in short: yo gun aint gonna work.

Tuesday, April 3, 2012

A unique holster project..

Couple months back I started work on a prototype holster, pictured below. To my knowledge it is the first Kydex inside-the-thigh holster. Many changes and improvements will be made based on lessons learned with this model. For example, Im deleting the mess of elastic straps supporting it and connecting them at slots in the holster body for a clean, uncluttered appearance and less of a chance of interference with reholstering.


Specs: 0.060" Kydex, Pancake design, bolted together with 3/16" blued hardware. 1" Velcro closure elastic strap fed through integrated slots in the holster keep it against the thigh and connect it to a Duro Ind Lambda NTS half-corset above the hips. The corset is split-front and tied with 5mm accessory cord, all seams Frenched and the eyelets reinforced with a 1" strip of Twill since the Lambda NTS is not strong or thick enough to support rivets. The 1" elastic is canted slightly and box stitched to the corset with Size 69 black bonded nylon thread. The MC Lambda NTS fabric shows through lightweight fabrics, white in particular. I will make the next, improved one with white or grey Lycra or a similar UnderArmor fabric to eliminate this issue. Multiple corsets may be necessary for multiple covering garments.This design eliminates the possibility of eventually wearing through thin underwear or garter belts by using metal clips and provides a better anchor for a heavy gun and holster than a garter belt. The bolt pattern fits Kydex IWB wings Ive made as well. The rigid holster provides a more consistent platform than any soft leather and more importantly it cannot bend inward when reholstering, causing an AD. This one is for a Walther PPS in 9mm. 6 and 7 round mags do not print with medium-weight fabrics. Currently working with a couple gals on T&E and perfecting the design. May take custom orders for it some day.

As of now, due to a need for a better name than "The Kydex Inside-The-Thigh Holster," Im calling it the Athena Holster.

Saturday, March 24, 2012

Boogie Time

How to turn Wiley X CQC lenses into unventilated Smith Optics Elite Boogie goggles. No regulators on em, naturally. Working on that. You could always just drill a bunch of holes along the top edge like Smith did. Thatd help somewhat. These have no padding, very uncomfy of course. Neoprene from cheap 5.11 kneepads or pirated components from the cheap sunglasses at your local convenience store would work brilliantly. All you need is a lens, padding, a drill and some shock cord. These are mounted using Ops-Core goggle mounts to maintain QD ability, but tying the shock cord directly to the ARC rail would work fine. Smith's far more professional version should be around $40, (plus ARC mount, probably), so this isnt a solution to a problem of expense. Just temporarily one of the best ways to cut down on a lens frame obscuring FOV. Keeping your peripheries open is paramount to maintaining situational awareness. Nothing does it better than a Boogie google.


Ill get the RBAV review up.... Sometime....

Sunday, January 8, 2012

BCM Gunfighter

AR charging handles went through a number of changes to account for changes in technique over the years, yada yada yada, as a result we ended up with extended release latches and forces on charging handles that the unit simply wasn't designed for. Eric over at VLTOR designed the product marketed as the "BCM Gunfighter" series of drop-in charging handles that have gained much respect, repute and admiration over the last year or so. In my year or so with it, I found a few innocuous issues that could be addressed in the pursuit of truly perfecting the component for practical use.


In case you weren't aware, its a 7075 T6 handle and release latch. I switched my primary to a new upper round 8 months ago and haven't noticed any excessive wear on the release latch's notch. The handle and release latch are hard coat anodized per Mil-A-8625F, Type III, Class 2 and I expect the spring is stainless. The handle features an ass unlike "standard" CHs that allows the release latch the contact the handle at its ass and tranfer force into it. This transfers much of the rearward force of single-handed manipulations into the handle body instead of weighing it all on a single roll pin as in "standard" designs. I had to machine out a replacement pin for a sheared roll pin just today... Not on a CH or anywhere near one, but nonetheless... The Gunfighter's system does seem more durable.

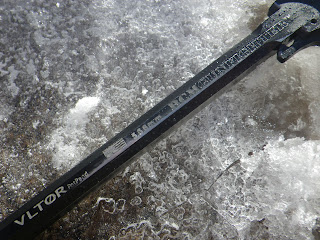
Laser engravings are on the top of the handle. VLTOR, BCM GUNFIGHTER, caliber and the stars and stripes:


Wear marks can be expected to go right through the anodization as with traditional CHs. Which side and where, exactly, the marks appear will depend on which hand is dominant and how, exactly, they manipulate their CH.


On the THE ISSUES. As previously stated, they are inconsequential and do NOT prevent the operator from making effective use of the weapon. For this reason, the gunfighter remains a significant improvement over traditional CHs and my preference for a practical use CH. That said, improvements that would not alter performance negatively could be made. They are as follows: My support hand index finger, as well as the support hand index fingers of many an end user, have been cut superficially though distractingly by the unfinished edge of the release latch, indicated below.


Beveling this edge would not increase production costs significantly and not decrease the structural integrity of the latch significantly while significantly increasing ease of use for non-gloved hands. I do love shooting a carbine with gloves, I find I fear the controls less and tend to manipulate the weapon more aggressively and ultimately more effectively, although I tend not to wear gloves when shooting: A) because I suck at handgun with gloves, and B) because I may be shooting at something coming into my house in the middle of the night and to loosely quote Bernie Mac from Ocean's Eleven, I don't wear gloves to bed since I find that it interferes with my personal agenda.


My only other issue with the product is theoretical and has absolutely no basis in my empirical experience with it. I decided to state that before stating the theoretical issue. If you'd like to completely ignore this commentary based on that, I'd completely understand. If you'd like to read on out of curiosity nonetheless, I'd understand as well.


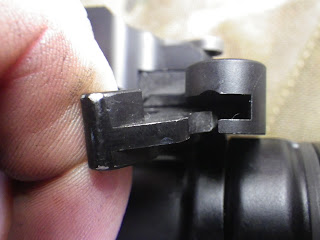
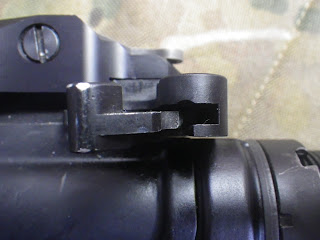
Tolerances between the release latch and the handle are rather loose and have loosened up slightly with use. The release latch does NOT move anywhere near perfectly about the axis created by its roll pin. As demonstrated below, after about 1000 rounds of primarily support-hand use, my release latch can move so far downward before moving backward as to contact the CH before releasing the CH. ...Locking it in place and stopping the rearward motion entirely. THIS HAS NEVER HAPPENED TO ME WHILE ACTUALLY USING THE PRODUCT AND I MUST INTENTIONALLY INDUCE IT. I trust the product to function effectively under all conditions, though tighter tolerance would certainly offer me more confidence. That's just me, bro.


The usual (this endplate has since been staked):